Thursday, October 29, 2020

Solr Integration with AEM


Solr Integration with AEM


Solr is one of the most powerful integrations with AEM to improve indexing/search.

However, AEM comes standard with a functional search feature based on Apache Jackrabbit Oak. This is what AEM will use to work with indexes and search in the platform that can be leveraged when creating new AEM applications with no added cost. This solution is appropriate in many cases, mostly with simple sites that use search as a secondary feature. However, it can fall short in applications looking for an advanced search experience and features, or with huge repository sizes.

Solr is a popular, blazing-fast, open source enterprise search platform built on Apache Lucene.

Solr is highly reliable, scalable, and fault tolerant.


For Solr index to work with Oak, we need to setup a connection to able to communicate with a Solr instance/cluster.       


HttpSolrClient API used to query on Solr.


Setup Solr on machine

Download and install the latest release of Solr server from the following URL:

http://archive.apache.org/dist/lucene/solr/


Unzip the file so that you are able to view the following file structure.

You can start the Solr server by opening the command prompt and changing the working directory to the bin folder located in the directory in which you extracted the ZIP file. Run the following command:

solr start -e cloud -noprompt

To verify that Solr is running, go to the following URL:

http://localhost:8983/solr/#/

You should see the Solr web client.


Create a collection


1. From the web client, select Collection in the right hand column (shown above).

2 . Click Add Collection.

3. Name the new collection: collection.


Configure AEM to use Solr server


Under Configuration Manager

Search for AEM Solr Search - Solr Configuration Service and enter the following values:


                                        Index values with Solr


Go to, http://localhost:4502/etc/solr/solrindexer.html


This page is invoking the IndexContentToSolr sling servlet (you can see the source code of this servlet in the OSGi section of this article). If the index operation is successful, a message confirming the operation was successful appears, as shown in the previous illustration.  

You can validate if the SOLR docs are created by going to the following URL:

http://localhost:8983/solr/#/collection/query


Select collection from the drop-down control and click the Execute Query button. If successful, you will see the result set that contains We-retail content. 


Dispatcher in AEM


Dispatcher in AEM


Dispatcher is CQ Load balancing and caching tool. It runs on web server (IIS or Apache).


In order to improve CQ response time it is very important that web server serves that most of the content.


Dispatcher provides following benefits:


·        Load Balancing: Dispatcher provide a way to balance load between different publish server.


·        Static Content delivery: Dispatcher provide powerful way to deliver and invalidate static content.


·        Security: Dispatcher add extra layer of security to CQ hosted site.


·        Fail safe coverage: In case CQ instance is down dispatcher can serve request.


·        Dispatcher module provide various configuration to optimise Content delivery in CQ.


Dispatcher follow simple rule:


·        If document is present in cache, dispatcher returns document from cache


·        If Document is not present in cache then request is made to CQ instance to serve document. In addition, depending upon if document can be cached or not it is cached in dispatcher.


There are two way content is being updated in dispatcher:


·        Content Update: Through Syndication request from Author or publish request. This cause cached files to be deleted from dispatcher and update "statfile".


·        Auto invalidation: This cause part of cache is invalidated without physically deleting cached file.


Which documents is subjected to caching in Dispatcher:


·        If document is requested through GET or HEAD request

·        If there is no query parameter (?) in request

·        If there is no extension to request. In that case, dispatcher cannot determine MIME Type and hence cannot cache.

·        If there is no authentication header to request.

·        If document is not denied by caching rule in dispatcher.


How Dispatcher returns document?


Setting CQ Dispatcher Flush Agent


CQ Flush Agent is required to invalidate / clean dispatcher cache. Before you set dispatcher Flush, make sure that replication agent is set up properly.


It is recommended to configure dispatcher flush agent on publish instance.

Configure Dispatcher Flush On Publish:


·        Go to HOST:PORT/libs/cq/core/content/login.html

·        Login as admin / admin

·        Then click on Tools -> Replications -> Agents on Publish

·        Then click on new -> Page -> Give Dispatcher Agent Information

·        Once page is created, Double click on dispatcher flush agent and then click on edit

·        Then on transport tab and enter dispatcher server URL.

·        URL is HOST:PORT/invalidate_only/dispatcher/invalidate.cache when this request reaches dispatcher, Dispatcher module knows that it is flush request and then it invalidate cache.

·        From Trigger Tab set triggers. This is required if you are setting dispatcher flush agent on publish instance (But not if you are setting it on author). Through these trigger replication agent knows when to trigger flush.

·        Once all settings are done you can select dispatcher flush agent and click on replicate (Make sure that replication agent is configured before and you see green light at the end of replication).

·        You can then create multiple flush agent using above steps.

·        Note that dispatcher flush only happens on resources of type cq:Page on publish instance.


AEM SPA


AEM SPA


*      Single page applications (SPAs) can offer compelling experiences for website users. By being faster, fluid, and more like a native application

*      SPA becomes a very attractive experience, developers want to be able to build sites using SPA frameworks and authors want to seamlessly edit content within AEM for a site built using such frameworks.

*      The SPA Editor offers a comprehensive solution for supporting SPAs within AEM.

*      When an SPA is built to leverage the AEM SPA Editor, the content author notices no difference when editing and creating content.


Important Points:

·         The Single-Page Application (SPA) Editor feature requires AEM 6.4 service pack 2 or newer.

·         The SPA Editor is the recommended solution for projects that require SPA framework based client-side rendering (React or Angular).

·         All SPA projects on AEM should be based on the Maven Archetype for SPA Starter Kit.


How SPA is different?

A single-page application (SPA) differs from a conventional page is that it is rendered client-side and is primarily Javascript-driven, relying on Ajax calls to load data and dynamically update the page. 

This reduces the need for page refreshes and presents an experience to the user that is seamless, fast, and feels more like a native app experience. 

             (Sequential web page)                                 (Single Page Application)


In a traditional, sequential web page, only the data needed for the immediate page is loaded. This means that when the visitor moves to another page, the server is called for the additional resources. 

Any SPA project on AEM should leverage the Maven Archetype for SPA Starter Kit.


AEM has provided sample SPA Website “we-retail-journal” below is the link:

https://github.com/adobe/aem-sample-we-retail-journal

You can directly download and build this project using command

mvn clean install –PautoInstallPackage

You can see the your single page Application working

Project Structure in AEM


Guidelines for SPA development in AEM


Developing single page applications on AEM assumes that the front-end developer observes standard best practices when creating an SPA.

·         *Portability* - As with any components, the components should be built to be as portable as possible. The SPA should be built with portable and reusable components.

·         *AEM Drives Site Structure* - The front end developer creates components and owns their internal structure, but relies on AEM to define the content structure of the site.

·         *Dynamic Rendering* - All rendering should be dynamic.

·         *Dynamic Routing* - The SPA is responsible for the routing and AEM listens to it and fetches based on it. Any routing should be dynamic as well.

If you keep these principles in mind as you develop your SPA, it will be as flexible and supports AEM authoring functionality.

For further details about SPA development on AEM including guidelines, walkthroughs, best practices and examples go to https://adobe.com/go/aem-dev-spa.


Deep dive into AEM SPA


The basic concept of SPA is to map a SPA Component to an AEM Component. AEM components, runs on server-side, which exports content in the form of JSON. The JSON content is consumed by the SPA, running on client-side in the browser. A 1:1 mapping between SPA components and an AEM component is created.


To build for AEM, the SPA project is compiled and automatically included in the AEM project.

Standard AEM Packages used to deploy the SPA into AEM.

SPA development iterations occur independently of AEM. When the SPA is ready to be deployed into AEM the following high-level steps take place (as illustrated above).


 ·         The AEM project build is invoked, which in turn triggers a build of the SPA project. The We.Retail Journal uses the frontend-maven-plugin .

·         The SPA project's aem-clientlib-generator embeds the compiled SPA as an AEM Client Library in the AEM project.

·         The AEM project generates an AEM package, including the compiled SPA, plus any other supporting AEM code.


Tuesday, October 27, 2020

Editable Templates In AEM


EDITABLE TEMPLATES


After AEM 6.3, it's recommended that all new Experience Manager Projects use Editable Templates over Static Templates. 

AEM has a new role of template-authors and these authors can create templates dynamically at any time as per the requirement.

Using the Adobe Maven 13 and above archetype project, you have the starting files required to produce Editable Templates. There is no longer a need to create Experience Manager projects by using Static Templates.


The following specifies the advantages of editable templates:


·         Can be created and edited by your authors.

·         After the new page is created, a dynamic connection is maintained between the page and the template. This means that changes to the template structure are reflected on any pages created with that template

·         Uses content policies (edited from the template editor) to persist the design properties (does not use Design mode within the page editor).

·         Are stored under /conf


There are three parts of template editor: 

1. templates: Here all the dynamic templates are contained which are created by template authors.


2. policies: There are two types of policies:

Template Level Policy: This policy is used to define client side libraries of all the pages, created from a particular template.

Component Level Policy: These policies are used to define components for a particular responsive grid (parsys)for all the pages created from the template.


3. template-types: This is a base template on the basis of which template author creates all its templates at the run time.


Structure under /conf folder


To create the folder using project code, make sure the folder has:

·         /conf/<your-project>/settings/wcm/templates, which holds all editable templates for this project

·         /conf/<your-project>/settings/wcm/policies, which holds all page and component content policies

·         /conf/<your-project>/settings/wcm/template-types, which is like the template of an editable template and is copied over to the template. This is required only if you use OOTB template types.

There are three OOTB template types:

·         /libs/settings/wcm/template-types/html5page

·         /libs/settings/wcm/template-types/afpage

·         /apps/settings/wcm/template-types/coreCmpPage


Creating an Editable Templates


A template created with the template editor acts as a container for the components.

In addition, you can define the way the template looks by setting styles

You can also define which components are allowed to be used within the template (and those pages that are based on the template).


Steps to create Editable template

1.    Go to http://localhost:4502/aem/start.html -> click on Tools -> select Templates or directly go to

http://localhost:4502/libs/wcm/core/content/sites/templates.html/conf

2.    Click the Create button to create a template.


3.    In the Create Template wizard, select the  Empty Page template type and click the Next button.


4.    Provide a title (HomeTemplate) and description for your template and click the Create button.

5.    Click Open button to open the template. 


Adding components to the templates


You can define a layout in the new template.

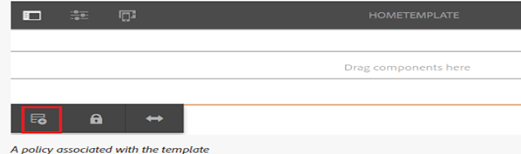
Click on the Policy icon, the first item in the toolbar


1.    When you click the Policy icon, this action opens the Default dialog. Here you can specify the set of components which are allowed to be placed into the Layout Containers.


2.    As of now, specify Layout Container (under General) and the project components (under your project name category).


3.    Finally, click the check mark in the top-right corner. 


You will now be back in the Template Editor. Drag the Layout Container component from the left panel onto the box labelled Drag components here. Once done, the template looks like the following image.


 Now you need to unlock the Layout container component so that an author can add components to it


You can set a policy for the Layout container that defines which components an author is allowed to use within the Layout container. To set the Policy for the Layout container, click on the Layout container, as shown here.


 Give policy title and select the components from allowed components


Before an Experience Manager author can use the template to create pages, you must enable it.

Mouse over the template and click the three dot icon and then select Enable.


Enabling the template from the Templates console:


·         Setting the status property on the jcr:content node.

·         For example, on:
/conf/<your-folder>/settings/wcm/templates/<your-template>/jcr:content

·         Define the property:

·         Name: status

·         Type: String

·         Value: enabled


The below diagram shows how templates, content, and components interrelate:


Important Note: The big difference between static and editable templates is that once a page is created with the template, no dependency is generated between them, so if the template is modified, it did not affect the pages existing. We only see the changes in a new page created from this template. But with editable templates, the page maintains a reference to the template with which it was created and any changes can be applied instantly in existing pages.

Editable templates retain a dynamic connection to any pages created from them. This ensures that any changes to the template are reflected in the pages themselves.


Create page based on editable template

1.    Go to sites http://localhost:4502/sites.html/content

2.    Select your project Folder 

3.    Click the Create button and select Page.

4.    Click on the HomeTemplate(editable) template to select it. Click the Next button.

5.    Provide title for your page and click on create.