Wednesday, November 4, 2020

Working with aemfed


Working with aemfed


aemfed is an open-source, command-line tool that can be used to speed up front-end development.


It is powered by aemsync Browsersync and Sling Log Tracer.


aemfed listens to file changes and automatically syncs the to a running AEM instance.


Based on the changes, a local browser will automatically refresh, thereby speeding up front-end development.


It also is built to work with Sling Log tracer to automatically display any server-side errors directly in the terminal.


 [QR Code] QR code of current url available in browser console using qr() or ___browserSync___.qr()

ADD jcr_root/apps/wknd/clientlibs/clientlib-site/components/header/styles/default.less

  Deploying to [localhost:4502] in 1624 ms at 2019-11-14T12:53:58.290Z: OK

[localhost:4502] Only styling was changed, try to inject

[Browsersync] File event [change] : /apps/wknd/clientlibs/clientlib-base.css

[Browsersync] File event [change] : /apps/wknd/clientlibs/clientlib-site.css

ADD jcr_root/apps/wknd/clientlibs/clientlib-site/components/header/styles/default.less

  Deploying to [localhost:4502] in 150 ms at 2019-11-14T12:54:33.997Z: OK

[localhost:4502] Only styling was changed, try to inject

[Browsersync] File event [change] : /apps/wknd/clientlibs/clientlib-base.css

[Browsersync] File event [change] : /apps/wknd/clientlibs/clientlib-site.css

ADD jcr_root/apps/wknd/clientlibs/clientlib-site/components/header/styles/default.less


Step 1: To show errors directly to the command line


Open http://localhost:4502/system/console/configMgr and search for Apache Sling Log Tracer.

Update the configuration to Enabled and Recording Servlet Enabled :


Step 2: Install “aemfed”


For this you need npm so, download and install it.

After that run the following command to install “aemfed” Globally.


npm install aemfeed --global


This will allow us to run aemfed from any directory.


Step 3:


From the command line navigate to the project home path.

Run the following command to start aemfed against an aem instance running on localhost:4502:


aemfed -t "http://admin:admin@localhost:4502" -w "ui.apps/src/main/content/jcr_root/"


Navigate using the proxy URL to the AEM page you have been working with for example: 


http://localhost:3000/content/wknd/en/first-article.html?wcmmode=disabled


You should now see the same contents of AEM but rendered via port 3000.


Step 4: See the changes directly on browser


Open any less/css project file from your drive in any editor of your choice and make the changes.

You can directly the see changes coming to browser as follows:


Under Command prompt:

C:\Users\rohit.chauhan\Downloads\aem-guides-wknd-master\aem-guides-wknd-master>aemfed -t "http://admin:admin@localhost:4502" -w "ui.apps/src/main/content/jcr_root/"

---------------------------------------

Working dirs: [

  'C:\\Users\\rohit.chauhan\\Downloads\\aem-guides-wknd-master\\aem-guides-wknd-master\\ui.apps\\src\\main\\content\\jcr_root'

]

Targets: http://admin:admin@localhost:4502

Proxy port: 3000

Interval: 100

Exclude:

---------------------------------------

Something missing or not working as expected, open an issue on GitHub: https://github.com/abmaonline/aemfed/issues

---------------------------------------

Scanning: C:\Users\rohit.chauhan\Downloads\aem-guides-wknd-master\aem-guides-wknd-master\ui.apps\src\main\content\jcr_root ...

Awaiting changes ...

---------------------------------------

Get state for all instances: 351 ms


Read file tree: 24 ms

TRYREADFILE WARN COULD NOT READ FILE  C:\Users\rohit.chauhan\Downloads\aem-guides-wknd-master\aem-guides-wknd-master\ui.apps\src\main\content\jcr_root\libs\wcm\foundation\clientlibs\grid\grid_base.less

Build style tree: 74 ms

[localhost:4502] Get data from server: 897 ms

[localhost:4502] Process data: 50 ms

[localhost:4502] Clientlib tree: 948 ms

Build style and clientlib trees: 949 ms

---------------------------------------

[Browsersync] Proxying: http://localhost:4502

[Browsersync] Access URLs:

 ---------------------------------------

       Local: http://localhost:3000

    External: http://192.168.54.130:3000

 ---------------------------------------

          UI: http://localhost:3001

 UI External: http://localhost:3001

 ---------------------------------------

[QR Code] QR code of current url available in browser console using qr() or ___browserSync___.qr()

ADD jcr_root/apps/wknd/clientlibs/clientlib-site/components/header/styles/default.less

  Deploying to [localhost:4502] in 1624 ms at 2019-11-14T12:53:58.290Z: OK

[localhost:4502] Only styling was changed, try to inject

[Browsersync] File event [change] : /apps/wknd/clientlibs/clientlib-base.css

[Browsersync] File event [change] : /apps/wknd/clientlibs/clientlib-site.css

ADD jcr_root/apps/wknd/clientlibs/clientlib-site/components/header/styles/default.less

  Deploying to [localhost:4502] in 150 ms at 2019-11-14T12:54:33.997Z: OK

[localhost:4502] Only styling was changed, try to inject

[Browsersync] File event [change] : /apps/wknd/clientlibs/clientlib-base.css

[Browsersync] File event [change] : /apps/wknd/clientlibs/clientlib-site.css

ADD jcr_root/apps/wknd/clientlibs/clientlib-site/components/header/styles/default.less

  Deploying to [localhost:4502] in 146 ms at 2019-11-14T12:54:44.227Z: OK

[localhost:4502] Only styling was changed, try to inject

[Browsersync] File event [change] : /apps/wknd/clientlibs/clientlib-base.css

[Browsersync] File event [change] : /apps/wknd/clientlibs/clientlib-site.css
ADD jcr_root/apps/wknd/clientlibs/clientlib-site/components/header/styles/default.less

  Deploying to [localhost:4502] in 99 ms at 2019-11-14T12:55:00.416Z: OK

[localhost:4502] Only styling was changed, try to inject

[Browsersync] File event [change] : /apps/wknd/clientlibs/clientlib-base.css

[Browsersync] File event [change] : /apps/wknd/clientlibs/clientlib-site.css

ADD jcr_root/apps/wknd/clientlibs/clientlib-site/components/header/styles/default.less

  Deploying to [localhost:4502] in 153 ms at 2019-11-14T12:55:19.686Z: OK

[localhost:4502] Only styling was changed, try to inject

[Browsersync] File event [change] : /apps/wknd/clientlibs/clientlib-base.css

[Browsersync] File event [change] : /apps/wknd/clientlibs/clientlib-site.css

ADD jcr_root/apps/wknd/clientlibs/clientlib-site/components/header/styles/default.less

  Deploying to [localhost:4502] in 162 ms at 2019-11-14T12:55:27.492Z: OK

[localhost:4502] Only styling was changed, try to inject

[Browsersync] File event [change] : /apps/wknd/clientlibs/clientlib-base.css

[Browsersync] File event [change] : /apps/wknd/clientlibs/clientlib-site.css

ADD jcr_root/apps/wknd/clientlibs/clientlib-site/components/header/styles/default.less

  Deploying to [localhost:4502] in 111 ms at 2019-11-14T12:55:49.098Z: OK

[localhost:4502] Only styling was changed, try to inject

[Browsersync] File event [change] : /apps/wknd/clientlibs/clientlib-base.css

[Browsersync] File event [change] : /apps/wknd/clientlibs/clientlib-site.css

ADD jcr_root/apps/wknd/clientlibs/clientlib-site/components/header/styles/default.less

  Deploying to [localhost:4502] in 96 ms at 2019-11-14T12:56:01.682Z: OK

[localhost:4502] Only styling was changed, try to inject

[Browsersync] File event [change] : /apps/wknd/clientlibs/clientlib-base.css

[Browsersync] File event [change] : /apps/wknd/clientlibs/clientlib-site.css


Content replication in AEM

Content replication in AEM


·        Replication agents are central to Adobe Experience Manager (AEM) as the mechanism used to Publish (activate) content from an author to a publish environment.


·        Return replication where user input (for example, form input) from the publish environment to the author environment (under control of the author environment).


Steps in Replication:

·        The author requests that certain content be published (activated).


·        The request is passed to the appropriate default replication agent.


·        The replication agent "packages" the content and places it in the replication queue.


·        The content is lifted from the queue and transported to the publish environment using the configured protocol; usually this is HTTP.


·        Servlet in the publish environment receives the request and publishes the received content; the default servlet is http://localhost:4503/bin/receive.


·        Multiple author and publish environments can be configured.


Here, by default below are the ports preconfigured for replication:


·        author environment on port 4502

·        publish environment on port 4503


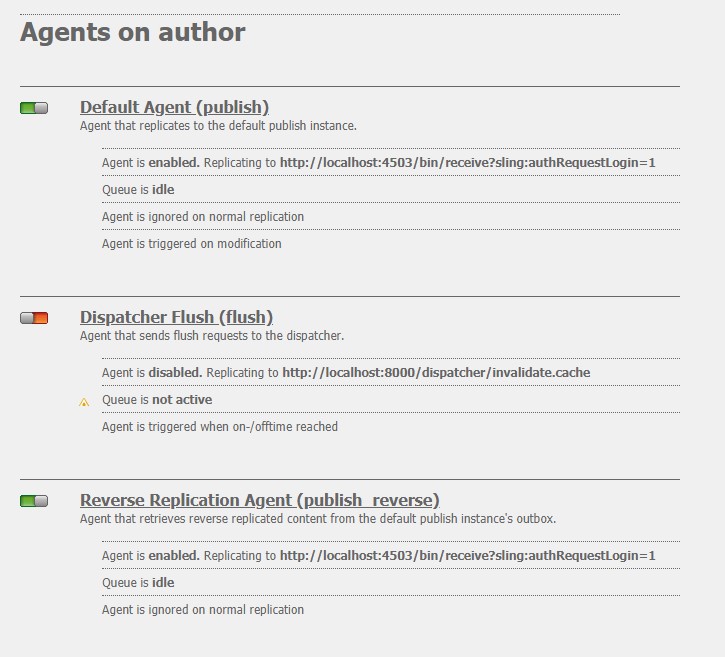
Open http://localhost:4502/etc/replication.html


Select Agents on author or go to,

http://localhost:4502/etc/replication/agents.author.html


Select Edit and check the default configuration for Default Agent (publish)


In this dialog, we can change the settings like “Auto Trigger” the page publish on any change.


User Can click on test connection to test where the replication settings are correct on not and get the status as follows:


Testing the Replication

For Testing there should be 2 Instances of AEM :

1.     author instance running on port 4502.

2.     publish instance running on port 4503.

Now open any We-Retail Page on author instance and do some changes as follows:

 http://localhost:4502/editor.html/content/we-retail/language-masters/en/men.html


Now Goto, http://localhost:4502/sites.html/content/we-retail/language-masters/en and select the Men Page and select Quick Publish from menu:


On Successful Replication/Publication status will get updated,


Now you can open the same page on publish environment and the same changes will be reflected there.


Creating Configuration for other Instances:


To configure replication of content for an additional publish instance you need to create, and configure, a new replication agent:


1.     Open http://localhost:4502/libs/cq/core/content/welcome.html

2.     From options select “Tools”

3.     Select Replication, then Agents on author in the left panel.

4.     Select New

5.     Set the Title and Name, then select Replication Agent.

6.     Click Create to create the new agent.

7.     Double-click the new agent item to open the configuration panel.

8.     Click Edit 


·         In the Settings tab:

·         Activate Enabled.

·         Serialization Type Default

·         Enter a Description.

·         Set the Retry Delay to 60000.

·         Leave the Serialization Type as Default.

·         In the Transport tab:

·         Enter the required URI for the new publish instance; for example,
    
http://localhost:4504/bin/receive.

·         Enter the site-specific user account used for replication.

·         You can configure other parameters as required.

9.     Click OK to save the settings.


If you have another instance running on Port 4504, you can test the connection.


Thursday, October 29, 2020

Solr Integration with AEM


Solr Integration with AEM


Solr is one of the most powerful integrations with AEM to improve indexing/search.

However, AEM comes standard with a functional search feature based on Apache Jackrabbit Oak. This is what AEM will use to work with indexes and search in the platform that can be leveraged when creating new AEM applications with no added cost. This solution is appropriate in many cases, mostly with simple sites that use search as a secondary feature. However, it can fall short in applications looking for an advanced search experience and features, or with huge repository sizes.

Solr is a popular, blazing-fast, open source enterprise search platform built on Apache Lucene.

Solr is highly reliable, scalable, and fault tolerant.


For Solr index to work with Oak, we need to setup a connection to able to communicate with a Solr instance/cluster.       


HttpSolrClient API used to query on Solr.


Setup Solr on machine

Download and install the latest release of Solr server from the following URL:

http://archive.apache.org/dist/lucene/solr/


Unzip the file so that you are able to view the following file structure.

You can start the Solr server by opening the command prompt and changing the working directory to the bin folder located in the directory in which you extracted the ZIP file. Run the following command:

solr start -e cloud -noprompt

To verify that Solr is running, go to the following URL:

http://localhost:8983/solr/#/

You should see the Solr web client.


Create a collection


1. From the web client, select Collection in the right hand column (shown above).

2 . Click Add Collection.

3. Name the new collection: collection.


Configure AEM to use Solr server


Under Configuration Manager

Search for AEM Solr Search - Solr Configuration Service and enter the following values:


                                        Index values with Solr


Go to, http://localhost:4502/etc/solr/solrindexer.html


This page is invoking the IndexContentToSolr sling servlet (you can see the source code of this servlet in the OSGi section of this article). If the index operation is successful, a message confirming the operation was successful appears, as shown in the previous illustration.  

You can validate if the SOLR docs are created by going to the following URL:

http://localhost:8983/solr/#/collection/query


Select collection from the drop-down control and click the Execute Query button. If successful, you will see the result set that contains We-retail content. 


Dispatcher in AEM


Dispatcher in AEM


Dispatcher is CQ Load balancing and caching tool. It runs on web server (IIS or Apache).


In order to improve CQ response time it is very important that web server serves that most of the content.


Dispatcher provides following benefits:


·        Load Balancing: Dispatcher provide a way to balance load between different publish server.


·        Static Content delivery: Dispatcher provide powerful way to deliver and invalidate static content.


·        Security: Dispatcher add extra layer of security to CQ hosted site.


·        Fail safe coverage: In case CQ instance is down dispatcher can serve request.


·        Dispatcher module provide various configuration to optimise Content delivery in CQ.


Dispatcher follow simple rule:


·        If document is present in cache, dispatcher returns document from cache


·        If Document is not present in cache then request is made to CQ instance to serve document. In addition, depending upon if document can be cached or not it is cached in dispatcher.


There are two way content is being updated in dispatcher:


·        Content Update: Through Syndication request from Author or publish request. This cause cached files to be deleted from dispatcher and update "statfile".


·        Auto invalidation: This cause part of cache is invalidated without physically deleting cached file.


Which documents is subjected to caching in Dispatcher:


·        If document is requested through GET or HEAD request

·        If there is no query parameter (?) in request

·        If there is no extension to request. In that case, dispatcher cannot determine MIME Type and hence cannot cache.

·        If there is no authentication header to request.

·        If document is not denied by caching rule in dispatcher.


How Dispatcher returns document?


Setting CQ Dispatcher Flush Agent


CQ Flush Agent is required to invalidate / clean dispatcher cache. Before you set dispatcher Flush, make sure that replication agent is set up properly.


It is recommended to configure dispatcher flush agent on publish instance.

Configure Dispatcher Flush On Publish:


·        Go to HOST:PORT/libs/cq/core/content/login.html

·        Login as admin / admin

·        Then click on Tools -> Replications -> Agents on Publish

·        Then click on new -> Page -> Give Dispatcher Agent Information

·        Once page is created, Double click on dispatcher flush agent and then click on edit

·        Then on transport tab and enter dispatcher server URL.

·        URL is HOST:PORT/invalidate_only/dispatcher/invalidate.cache when this request reaches dispatcher, Dispatcher module knows that it is flush request and then it invalidate cache.

·        From Trigger Tab set triggers. This is required if you are setting dispatcher flush agent on publish instance (But not if you are setting it on author). Through these trigger replication agent knows when to trigger flush.

·        Once all settings are done you can select dispatcher flush agent and click on replicate (Make sure that replication agent is configured before and you see green light at the end of replication).

·        You can then create multiple flush agent using above steps.

·        Note that dispatcher flush only happens on resources of type cq:Page on publish instance.